
Tel:
+86-551-6346-0808
Factory Add:
Plant 5-6, Zhongnan High Tech Industrial Park, Zhegao, Chaohu City, Anhui. 

Views: 0 Author: Site Editor Publish Time: 2026-07-23 Origin: Site
A failing A/C Fan Motor compromises system efficiency, drives up energy costs, and risks catastrophic compressor failure if left unaddressed. Selecting the right replacement requires navigating a maze of frame sizes, RPMs, and operational configurations. Homeowners and facility managers often struggle to decipher complex data plates. They risk buying incompatible parts that disrupt cooling cycles. You need a structured approach to avoid costly downtime.
This guide strips away marketing noise to provide a strictly technical, parameter-based framework for sourcing, evaluating, and replacing an A/C fan motor safely and accurately. We outline how to diagnose underlying failures before you purchase parts. We explain critical sourcing metrics like voltage, amperage, and NEMA frame sizes. You will also learn essential maintenance steps to ensure your new hardware operates flawlessly for years.
Accurate troubleshooting prevents unnecessary expenses. Technicians often replace functional motors because they misdiagnose external component failures. You must isolate the true source of the breakdown before ordering replacement parts.
A humming sound emitting from the condenser unit usually points to a dead run capacitor rather than a dead motor. You can test this by carefully giving the fan blade a manual push-start using a non-conductive stick. If it spins up and runs normally after the push, the capacitor has failed. A bulging or leaking capacitor provides a clear visual cue of this failure.
Conversely, a seized air conditioner motor behaves differently. The system might trip high thermal limits quickly after startup. You will feel severe physical resistance when trying to spin the blade manually. Grinding sounds or a wobbly shaft clearly indicate internal mechanical failure. Always verify capacitor health with a digital multimeter before condemning the motor.
Industry professionals rarely repair modern sealed condenser motors. Internal components degrade heavily over thousands of operating hours. If bearings fail or copper windings short to ground, full replacement remains the only reliable path.
Rewinding a small fractional horsepower motor simply costs too much in labor. Swapping the entire unit ensures operational reliability and prevents mid-season breakdowns. Attempting to lubricate sealed bearings or patch internal shorts often leads to secondary electrical fires or sudden catastrophic stops. We strongly advise replacing the entire unit when internal mechanical faults arise.
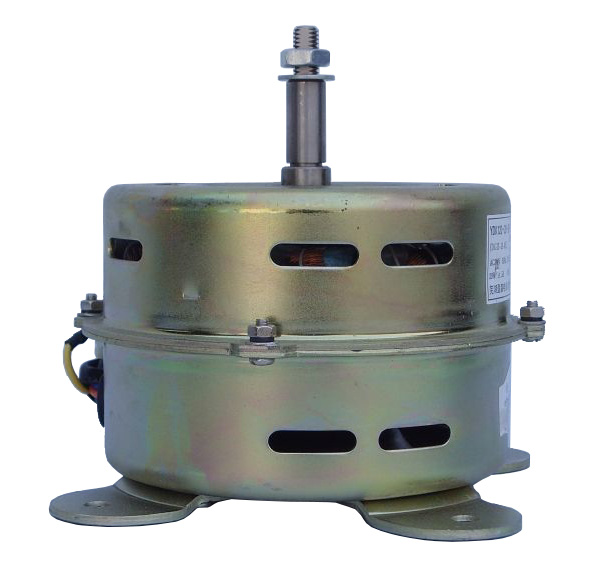
Finding the correct replacement demands strict attention to the original data plate. Visual similarities mean nothing in electrical engineering. You must evaluate four critical dimensions to guarantee a safe installation.
Sourcing an HVAC replacement motor requires exact voltage matching. Single-phase residential units typically utilize 208-230V power. You cannot substitute a 115V motor into a 230V circuit without destroying the equipment instantly.
Full Load Amps (FLA) represent the maximum current the unit draws under a normal operational load. Your replacement FLA must equal or slightly exceed the original rating. If you install an undersized motor with a lower FLA, it will overheat. The internal thermal protectors will trip repeatedly during peak summer temperatures. Always size the amperage correctly to handle the system demands.
Revolutions Per Minute (RPM) dictates the exact volume of airflow crossing the condenser coil. Common residential speeds include 825 RPM and 1075 RPM. A mismatch here severely alters system refrigerant pressures.
If you replace a 1075 RPM unit with an 825 RPM unit, the system fails to remove enough heat. Head pressures will skyrocket, placing extreme stress on the compressor. Conversely, installing a faster motor creates excessive noise and turbulent static pressure. Always match the original RPM rating precisely to maintain balanced heat transfer.
Manufacturers adhere to standard NEMA frame sizes. The common 48 frame measures roughly 5.5 inches in diameter. This standardization ensures the physical body fits into the existing mounting brackets.
Shaft length and diameter must also align perfectly. Most residential fan blades require a 1/2-inch or 5/8-inch shaft hub. The shaft must possess a flat edge for the set screw to grip securely. Exact dimensional matching ensures the existing fan blade fits perfectly without introducing destructive wobbles or vibration.
Rotation direction serves as a critical variable for airflow. Manufacturers define direction by viewing the unit from either the Lead End (LE) or the Shaft End (SE). Clockwise (CW) from the shaft end means counter-clockwise (CCW) from the lead end.
You must verify this viewing standard before ordering. Installing a unit that spins backward blows hot air down into the compressor rather than exhausting it upward. This mistake triggers high-pressure safety shutoffs within minutes. We highly recommend buying reversible models if you feel uncertain about the original orientation.
Facility managers and DIY homeowners face a common dilemma: buy original parts or aftermarket alternatives. Both categories offer distinct advantages depending on your technical skill and budget constraints.
A direct Original Equipment Manufacturer (OEM) replacement provides the safest and most straightforward installation path.
Universal aftermarket alternatives fill the gap when OEM parts prove unavailable or too expensive.
You must weigh facility downtime tolerance against your maintenance budget. We recommend using the following evaluation chart to make an informed choice.
| Evaluation Metric | OEM Replacement | Aftermarket Universal |
|---|---|---|
| Fitment | Exact drop-in match. | Requires bracket adjustments. |
| Installation Time | Fast (No modifications). | Slower (Shaft cutting, wiring). |
| Cost | High premium pricing. | Highly budget-friendly. |
| Availability | Can be delayed for old units. | In stock at most supply houses. |
Modernizing your system presents an opportunity to improve energy consumption. However, upgrades require careful planning to ensure compatibility with your existing electronic architecture.
Standard Permanent Split Capacitor (PSC) designs represent the legacy standard in residential cooling systems. They rely on an external run capacitor to maintain a secondary electrical phase.
They offer a low upfront cost and exceptional long-term reliability. Most older systems utilize single or dual-speed PSC configurations. While they consume more electricity than modern alternatives, they feature incredibly simple wiring. Their robust mechanical design tolerates minor voltage fluctuations well.
Upgrading to a high efficiency fan motor, such as an Electronically Commutated Motor (ECM), presents a strong business case. They convert incoming alternating current into direct current internally. This process delivers substantial energy savings and ensures much quieter operation.
However, implementation carries significant risks. You cannot simply drop an ECM into a legacy unit designed for a basic PSC. This upgrade requires verifying electronic control board compatibility. Without a proper control board retrofit, the advanced ECM will fail to receive the correct PWM (Pulse Width Modulation) signals. It simply will not run.
Evaluate whether your existing architecture supports an upgrade without requiring extensive modifications. Use this decision checklist before committing to an ECM retrofit:
Replacing the main component represents only half the job. You must perform coupled maintenance tasks to ensure the new hardware survives extreme summer conditions.
Capacitors suffer from internal chemical degradation over time. Even if the old capacitor still runs, its capacitance rating has likely dropped. Installing a pristine unit on a degraded capacitor severely reduces the new hardware's lifespan.
The weakened capacitor forces the system to draw higher starting currents. This creates excess heat within the copper windings. Always replace the run capacitor alongside the new installation. This mandatory industry best practice ensures optimal starting torque and protects your financial investment. Common mistakes include ignoring this rule to save a few dollars, resulting in premature failure.
Reusing the old fan blade requires careful visual inspection. You must check the metal for micro-cracks near the central hub. A cracked blade will eventually shatter under high RPM loads, tearing through the aluminum condenser coils.
Furthermore, you must ensure the blade sits at the exact depth within the fan shroud. Note the original clearance before removing the old blade. Incorrect positioning disrupts airflow dynamics. It dramatically reduces the static pressure required to pull heat away from the coils. If the blade feels stuck due to rust, use a specialized puller tool rather than striking it with a hammer.
Replacing the fan requires removing the top grille of the condenser. This creates the perfect, unobstructed opportunity for deep coil cleaning. Dirty coils act like an insulating blanket, trapping heat inside the system.
Follow these steps to clean the system effectively:
Removing embedded dirt ensures the new unit isn't fighting abnormally high head pressure from day one. Clean coils guarantee the system rejects heat efficiently.
Selecting the correct replacement hinges on strict parameter matching. Always verify specifications directly off the original data plate rather than relying solely on the user manual. You must decide between the convenience of an exact OEM replacement and the broad availability of universal aftermarket options. Remember to secure a matching run capacitor to protect your new equipment from high-amperage heat damage.
As a practical next step, locate your system's exact model and serial numbers. Cross-reference these details with technical supply catalogs to build your shortlist. If you feel uncertain about high-voltage wiring, capacitor discharging, or shaft modifications, contact a certified HVAC technician to handle the installation safely.
A: Typically 10–15 years, contingent on proper capacitor matching, balanced fan blades, and clean condenser coils.
A: Yes, stepping up slightly (e.g., 1/4 HP to 1/3 HP) is generally acceptable if RPM matches, but stepping down will cause the motor to burn out.
A: The fan will push air down into the unit instead of exhausting it upward, causing the compressor to overheat and trip on high-pressure safety controls within minutes.


